Toy – Jeremiah Blakley (Figaro Model Kit)
Watch the Video of Kevin reviewing the kit
Words and Pictures Jeremiah Blakley
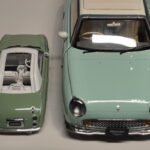
Exciting new things are happening in the Figaro world- If you are like me you love little accessories for your cars and one of those common accessories is a model that looks just like the big one. Maybe you sit it on your desk so you can be reminded of your favourite Japanese Italian car during the long winter months. The problem is, that the largest model available was 1/43 scale. Until now.
With the advent of cheap hobby grade 3d printers and a fellow named Hora80 on the website cults3d.com, you can print yourself a Figaro at 1/24 or a 1/18 or as large as you can fit in your printer.
Do not be afraid of 3D printers. they are amazing little machines that aren’t all that hard to work, they just take a bit of fiddly work to get setup and then tinkering to keep running- There are two types of printer
The first one is called “FDM” and it uses a plastic string, kind of like a weed whipper line, that melts and squirts out of a nozzle onto a plate. Slowly draw out the layers until the shape is finished. It makes a decent and tough model, but the finish isn’t as smooth as I’d like for a model car. You can see the layer lines in the final print no matter what you do. This is the choice to use, however, if you are going to make an RC car body that might encounter a curb. some sanding and filling of the body shape will make a nice model and if you are willing to put in the work you get a very nice finished kit. There aren’t any restrictions on where you can stick the printer but they tend to be loud and they don’t like drafty places. A warm and enclosed spot far away from everyone is ideal. I use the little cupboard under my stairs for my printer.
The second type of printer is the Liquid Resin type. These use a U.V. reactive liquid plastic in a vat that a plate is lowered into, then a screen underneath the vat of resin flashes the image of the layer onto the plate. The light from the screen cures the plastic, which fuses with the plate. then the plate moves up a tiny amount and the next layer is flashed onto the plate, slowly building up the layers. This usually results in a much smoother model with very few if any layer lines. There are caveats; the resin ones use some rather nasty chemicals in the liquid resin so rubber gloves and face masks are a must- as is a ventilated place to set up the machine. I took a cheap bookcase, put a vent fan in the rear of it and directed the air out a window. a plastic shower curtain is the door to this makeshift booth. You also must wash the excess liquid resin off the completed model, this is usually accomplished with nearly pure Isopropyl Alcohol unless you decide to go with the water-soluble resin, which I’ve got no personal experience with so I don’t have an opinion on them. I put mine in the basement because of the smell. It sits quietly in my basement churning out models for me to paint- far more than I will ever be able to finish in my lifetime.

You are also going to need a Slicer. Not the one from your kitchen, you need a FILE slicer. This bit of software takes the 3d object file and turns it into layers the printer can understand, it carries the information about the type of material, how fast to print, where to orient the model and how to support the model so that overhanging bits don’t fail to print (if there is nothing under a bit of plastic when it tries to cure- it will have nowhere to stick and will end up in the tank or rolling around the plate) The supports will get cut off the model when it’s done but there’s a bit of craft in getting them in the right spots so the mirrors stay on the car, for example. And you want to put the supports where they are easy to remove and don’t damage the model coming off, or are easy to sand smooth after printing. For example, you print the tyres with the hubcap facing up, so the supports are on the back and the face is unmarred. There are many slicer programs out there – many of them are free, so you can just download one, grab a free file(of anything) from the internet and fiddle with it, resizing, orienting and supporting it, even if you don’t have a printer. If you wanted, you could then send the file off to a commercial printer place- they will print it and send it back, you can even just send them the file without slicing and pay them to support, slice and print it for you if you don’t want another hobby of 3d printing things.
But what about the actual reason you are reading this? the new Figaro file? Here is a review of the file
The file is presented as a 1991 Nissan Figaro, which it mostly gets right. The native file size works out to be 1/18 which is a common Radio Control car size- it would be a snap to mount one on a chassis and zoom around the next car meet. I wanted a 1/24 to fit in my model car collection so I started with resizing and supporting the model at that size. if a Figaro is 3740 mm long, this file is 1/18 scale- a common die-cast size as well. It should shrink or grow to 1/24 (155 mm model)-common model car size or 1/12 (311 mm)- common RC car size, without too much trouble. However, if you wanted to go larger or smaller than that I’d contact the designer to modify the file for you as the wall thickness will grow and shrink with the model until it becomes paper thin or extra thick. If you went smaller I’d suggest you have the parts simplified as well.
The Problems- please note all of these are typical for model car builders- warped bodies and missing parts are nothing new to us. If you are determined and crafty, you CAN build a nice car despite the troubles of this particular kit, Go ahead and give it a try!
1- the door cards are part of the body shell, so it’s a hard job to paint them. And they are hollow with no drain holes so they trap resin when printing- very not good. I’d remember to punch holes in the body during setup to stop this being a problem- or fill the void in the slicer
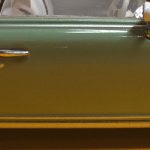
2- the door/boot/hood/roof/body line openings haven’t got deep enough lines to see them after printing at 1/24- you will have to go over them with a scribe tool to make them stand out.
3-the headlights are very thin and don’t always print right at 1/24, this isn’t a problem for me as I plan to remove them anyway for LED lights, 10 mm domed white lights would fit just right and look like the round glass light.
4- the interior is one piece when it really should be several, the interior tub, the seats and the steering column, between 5 and 7 parts. This would allow easier painting and assembly. Sometimes the editor would separate the parts just fine and then you can build it better
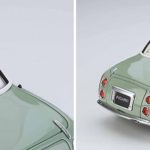
5- the headlight surround has a wonky shape that doesn’t quite translate to the actual car. This I can’t fix, but I don’t care, it’s nitpick anyway.
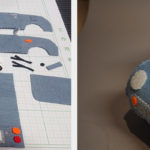
6- The chassis is a flat plate with no suspension or engine or underneath detailing, no wheel arches or axle posts so you will have to make a solution yourself as you can see the rear tyres from inside the car, Dowel rod axles
and cardstock arches to the rescue here
7- the overall shape is a kinda low polygon in some spots, which means you’ll need to sand some triangles down into smooth shapes and maybe fill a few low spots to get a glass-smooth finish. please note all these pics are of my third test print and there are still kinks to work out, I didn’t clean all the supports off because I know this is a wasted print, Number 4 is the charm. I’ll be saving the settings for this one though, I expect to be printing a lot of these.
I’m excited about this project, any help from other people would be appreciated and I hope the designer hears from us and makes a few changes to help us modellers out.
You can buy the 3D File for £10.54 (June 2024) by clicking here > https://cults3d.com/en/3d-model/game/nissan-figaro-1991-printable-car


